SeedVR2 Installation Guide (Version 2.5.0 ๐ŸŽ‰)

Step 1: Download ComfyUI (portable) Windows

Windows Download: ComfyUI_windows_portable_nvidia.7z

After downloading, you can decompression the file to extract the compressed package.


Step 2: Install ComfyUI-Manager

Download ComfyUI-Manager to ComfyUI custom_nodes folders using the command

git clone https://github.com/Comfy-Org/ComfyUI-Manager


Step 3: Install SeedVR2

Now you get a new button on the Menu (Top or Bottom depends on setting)

Click Custom Nodes Manager and search for seedvr2

After Install, click Restart to restart the server.
After Restart, click Confirm button to refresh Browser


Step 4: Create Workflow for SeedVR2.

Download the example workflow in json file and simply drag it onto ComfyUI.

Here are the official workflow for SeedVR2 Version 2.5.0 :tada:

Upscale Image:

SeedVR2_simple_image_upscale.json (9.3 KB)

SeedVR2_4K_image_upscale.json (9.3 KB)

Upscale Video:

SeedVR2_HD_video_upscale.json (10.7 KB)

Step 5: Load image/video and select Model

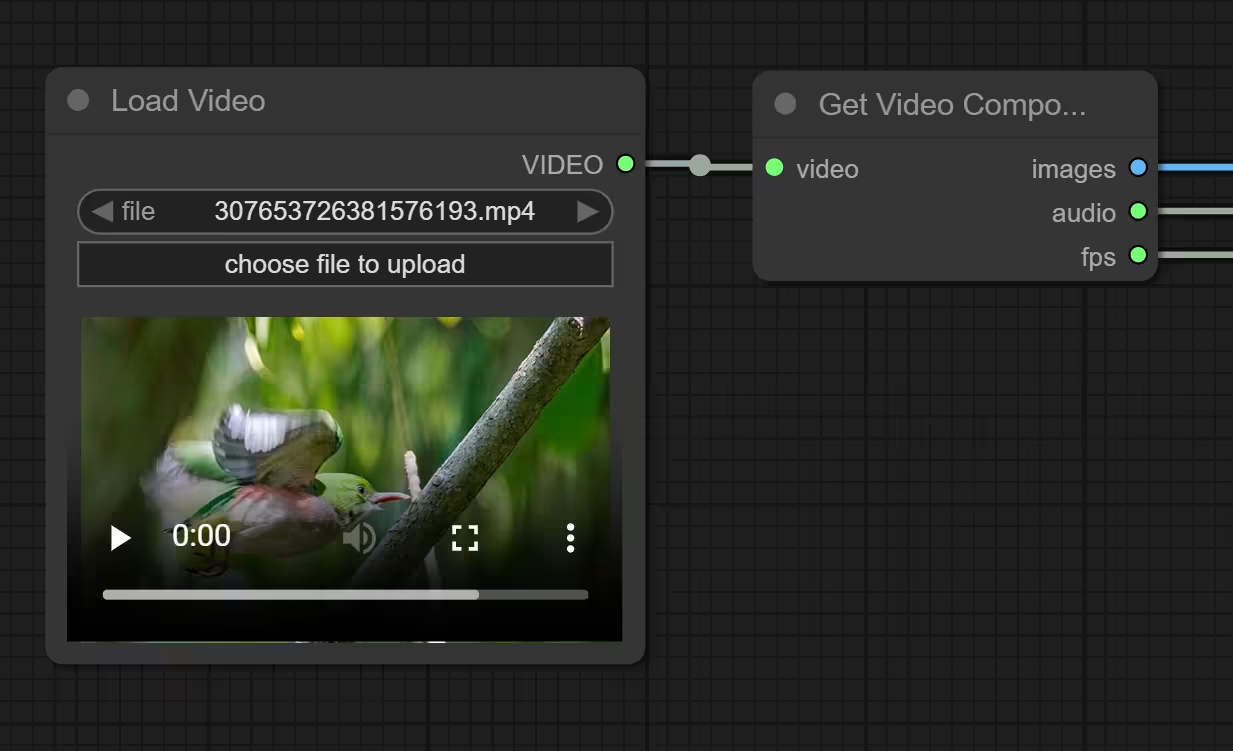
You can pick which model you perfer.
3b, 7b, 7b_sharp. All of them have fp8, fp16 and Q4/8 gguf version.
To make everytime simple, 3b is the smaller size model and 7b_sharp is the sharper version of 7b. The default model for video upscale is 3b_fp8.

The model will be download automatically when you first run the workflow.
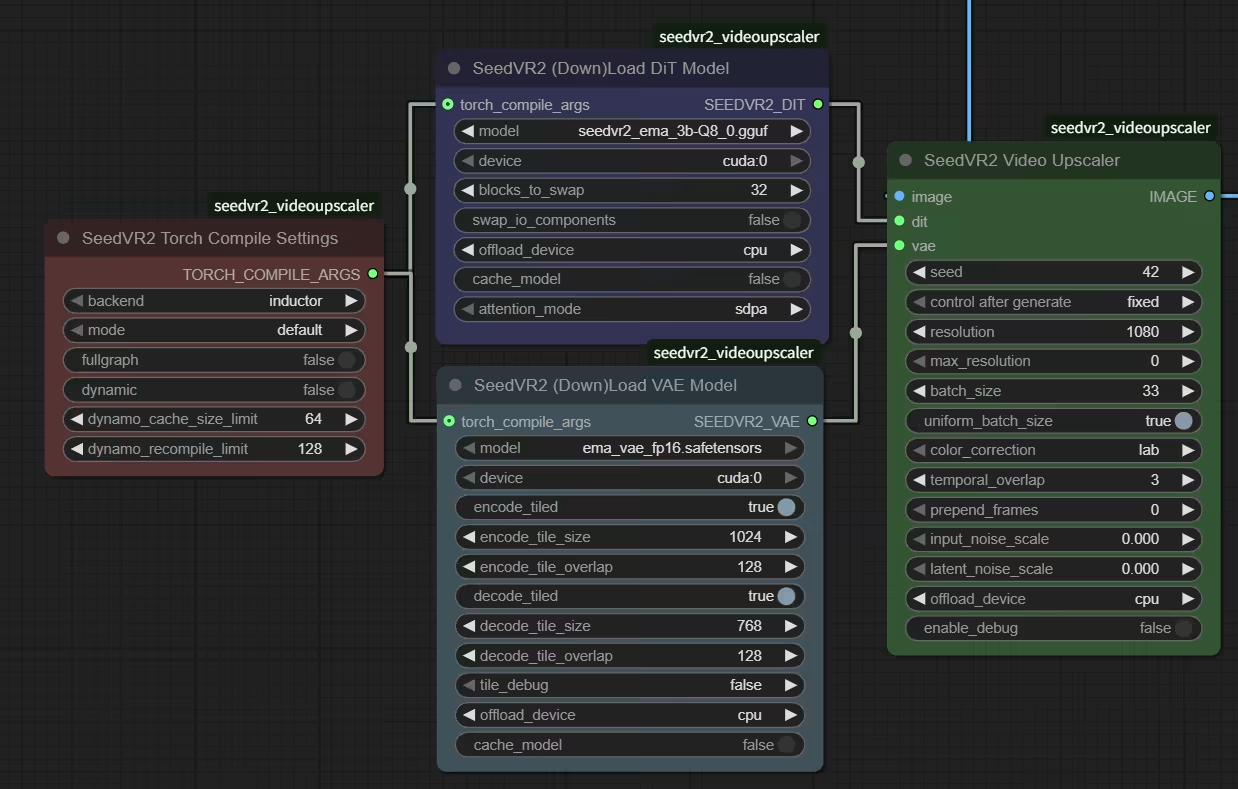
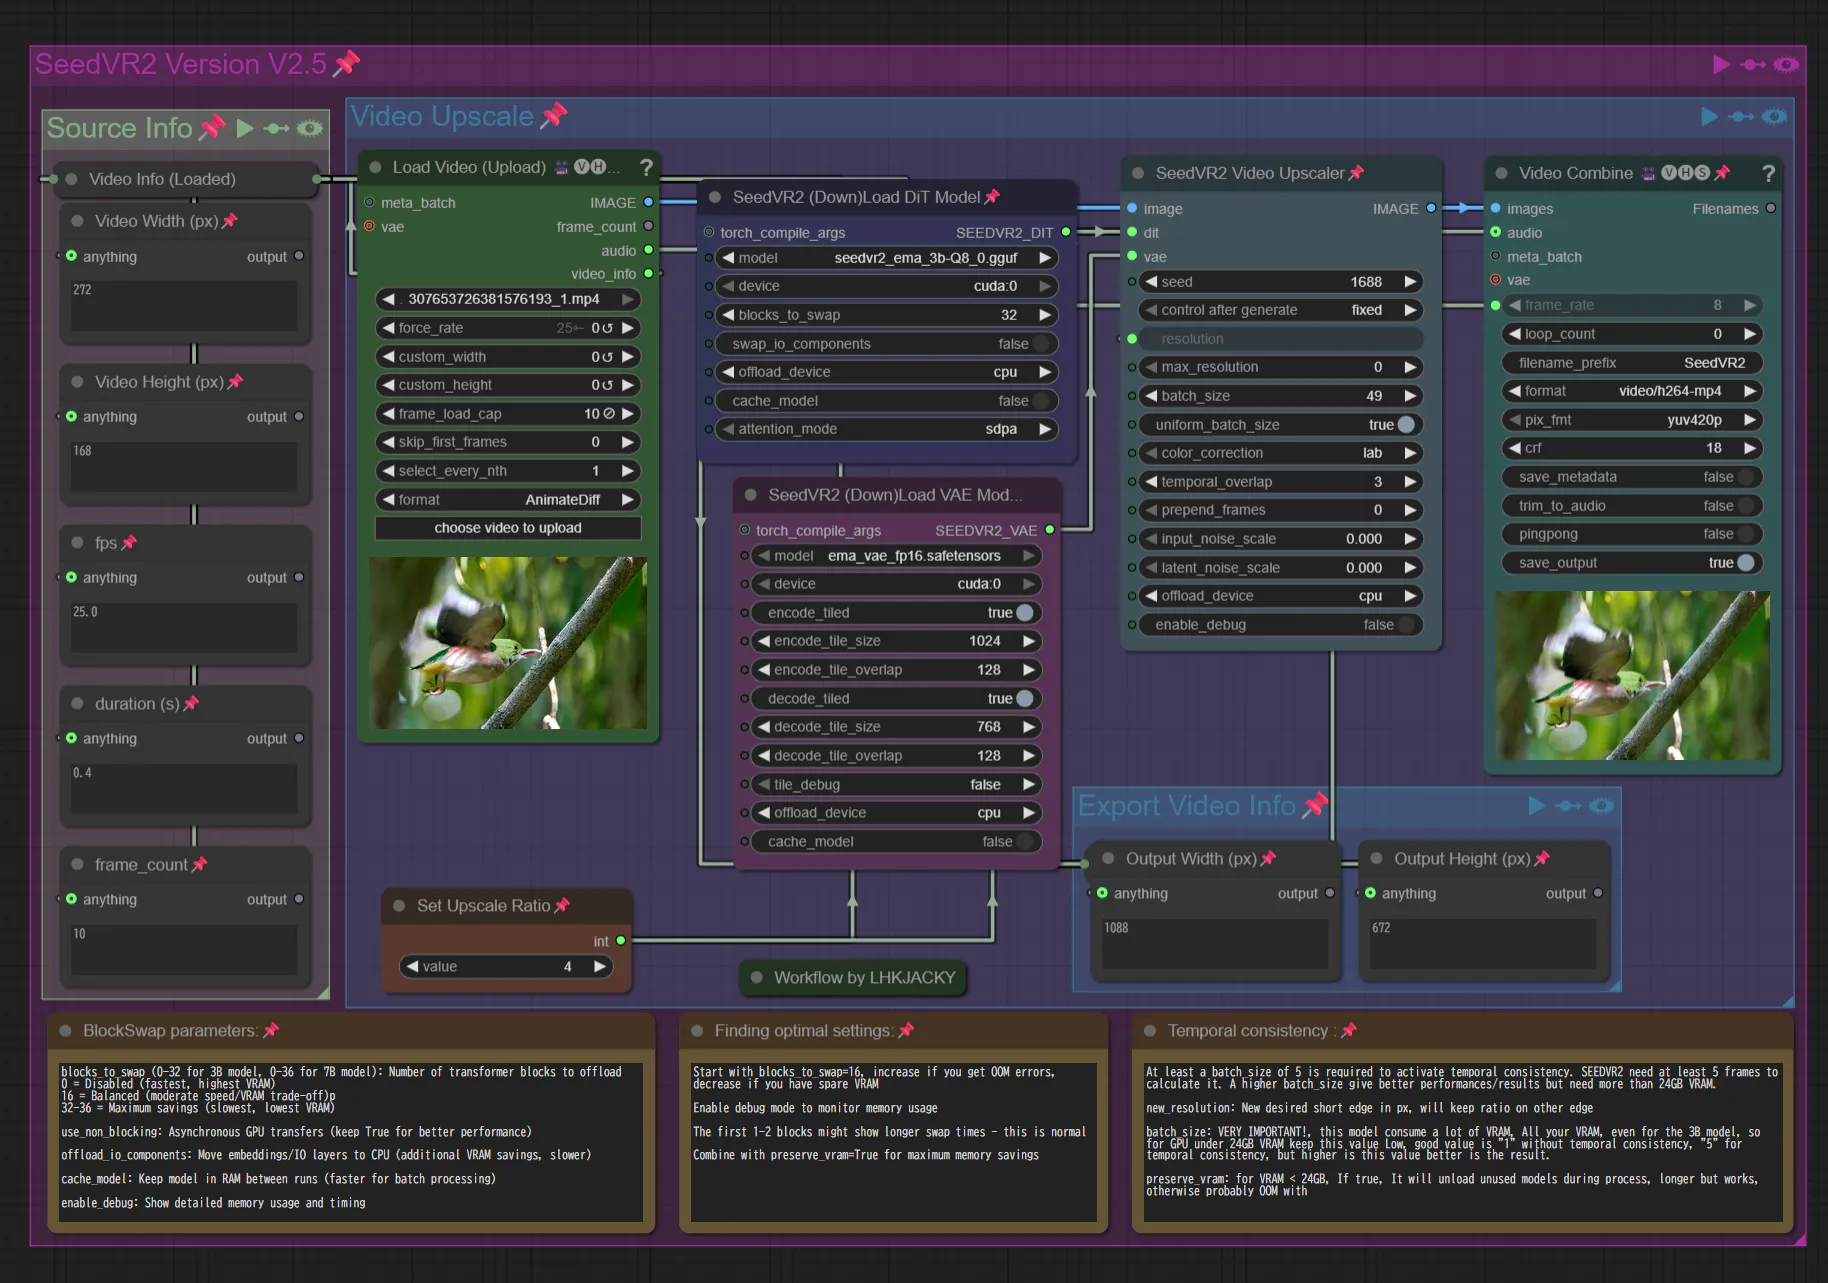
[15:12:39.137]
[15:12:39.138]   โ•”โ•โ•โ•โ•โ•โ•โ•โ•โ•โ•โ•โ•โ•โ•โ•โ•โ•โ•โ•โ•โ•โ•โ•โ•โ•โ•โ•โ•โ•โ•โ•โ•โ•โ•โ•โ•โ•โ•โ•โ•โ•โ•โ•โ•โ•โ•โ•โ•โ•โ•โ•โ•โ•โ•โ•โ•โ•โ•โ•—
[15:12:39.138]   โ•‘ โ–ˆโ–ˆโ–ˆโ–ˆโ–ˆโ–ˆโ–ˆ โ–ˆโ–ˆโ–ˆโ–ˆโ–ˆโ–ˆโ–ˆ โ–ˆโ–ˆโ–ˆโ–ˆโ–ˆโ–ˆโ–ˆ โ–ˆโ–ˆโ–ˆโ–ˆโ–ˆโ–ˆ  โ–ˆโ–ˆ    โ–ˆโ–ˆ โ–ˆโ–ˆโ–ˆโ–ˆโ–ˆโ–ˆ  โ–ˆโ–ˆโ–ˆโ–ˆโ–ˆโ–ˆโ–ˆ โ•‘
[15:12:39.138]   โ•‘ โ–ˆโ–ˆ      โ–ˆโ–ˆ      โ–ˆโ–ˆ      โ–ˆโ–ˆ   โ–ˆโ–ˆ โ–ˆโ–ˆ    โ–ˆโ–ˆ โ–ˆโ–ˆ   โ–ˆโ–ˆ      โ–ˆโ–ˆ โ•‘
[15:12:39.138]   โ•‘ โ–ˆโ–ˆโ–ˆโ–ˆโ–ˆโ–ˆโ–ˆ โ–ˆโ–ˆโ–ˆโ–ˆโ–ˆ   โ–ˆโ–ˆโ–ˆโ–ˆโ–ˆ   โ–ˆโ–ˆ   โ–ˆโ–ˆ โ–ˆโ–ˆ    โ–ˆโ–ˆ โ–ˆโ–ˆโ–ˆโ–ˆโ–ˆโ–ˆ  โ–ˆโ–ˆโ–ˆโ–ˆโ–ˆ   โ•‘
[15:12:39.138]   โ•‘      โ–ˆโ–ˆ โ–ˆโ–ˆ      โ–ˆโ–ˆ      โ–ˆโ–ˆ   โ–ˆโ–ˆ  โ–ˆโ–ˆ  โ–ˆโ–ˆ  โ–ˆโ–ˆ   โ–ˆโ–ˆ โ–ˆโ–ˆ      โ•‘
[15:12:39.138]   โ•‘ โ–ˆโ–ˆโ–ˆโ–ˆโ–ˆโ–ˆโ–ˆ โ–ˆโ–ˆโ–ˆโ–ˆโ–ˆโ–ˆโ–ˆ โ–ˆโ–ˆโ–ˆโ–ˆโ–ˆโ–ˆโ–ˆ โ–ˆโ–ˆโ–ˆโ–ˆโ–ˆโ–ˆ    โ–ˆโ–ˆโ–ˆโ–ˆ   โ–ˆโ–ˆ   โ–ˆโ–ˆ โ–ˆโ–ˆโ–ˆโ–ˆโ–ˆโ–ˆโ–ˆ โ•‘
[15:12:39.138]   โ•‘                         ยฉ ByteDance Seed ยท NumZ ยท AInVFX โ•‘
[15:12:39.138]   โ•šโ•โ•โ•โ•โ•โ•โ•โ•โ•โ•โ•โ•โ•โ•โ•โ•โ•โ•โ•โ•โ•โ•โ•โ•โ•โ•โ•โ•โ•โ•โ•โ•โ•โ•โ•โ•โ•โ•โ•โ•โ•โ•โ•โ•โ•โ•โ•โ•โ•โ•โ•โ•โ•โ•โ•โ•โ•โ•โ•
[15:12:39.138]
[15:12:39.139] ๐Ÿ“ฅ Downloading D:\ComfyUI_SeedVR2\ComfyUI\models\SEEDVR2\seedvr2_ema_3b-Q8_0.gguf from https://huggingface.co/AInVFX/SeedVR2_comfyUI/resolve/main/seedvr2_ema_3b-Q8_0.gguf...
seedvr2_ema_3b-Q8_0.gguf: 100%|โ–ˆโ–ˆโ–ˆโ–ˆโ–ˆโ–ˆโ–ˆโ–ˆโ–ˆโ–ˆโ–ˆโ–ˆโ–ˆโ–ˆโ–ˆโ–ˆโ–ˆโ–ˆโ–ˆโ–ˆโ–ˆโ–ˆโ–ˆโ–ˆ| 3.41G/3.41G [00:56<00:00, 64.6MB/s]
[15:13:38.767] โœ… Downloaded and validated: seedvr2_ema_3b-Q8_0.gguf
[15:13:38.768] ๐Ÿ“ฅ Downloading D:\ComfyUI_SeedVR2\ComfyUI\models\SEEDVR2\ema_vae_fp16.safetensors from https://huggingface.co/numz/SeedVR2_comfyUI/resolve/main/ema_vae_fp16.safetensors...
ema_vae_fp16.safetensors: 100%|โ–ˆโ–ˆโ–ˆโ–ˆโ–ˆโ–ˆโ–ˆโ–ˆโ–ˆโ–ˆโ–ˆโ–ˆโ–ˆโ–ˆโ–ˆโ–ˆโ–ˆโ–ˆโ–ˆโ–ˆโ–ˆโ–ˆโ–ˆโ–ˆโ–ˆโ–ˆ| 478M/478M [00:07<00:00, 64.9MB/s]
[15:13:47.133] โœ… Downloaded and validated: ema_vae_fp16.safetensors
[15:13:47.133] ๐Ÿƒ Creating new runner: DiT=seedvr2_ema_3b-Q8_0.gguf, VAE=ema_vae_fp16.safetensors
[15:13:47.148] ๐Ÿš€ Creating DiT model structure on meta device
[15:13:47.212] ๐ŸŽจ Creating VAE model structure on meta device
[15:13:47.402]


Note that the new Version 2.5.0 :tada: that just release today has make lots of change to the perviouse version. Old workflow wonโ€™t work on current version without modification.

They have split the node to 4 nodes.
(DiT model, VAE model, torch.compile settings, and main upscaler for granular control)


Step 6: Install ComfyUI-VideoHelperSuite (Optional)

Since you have already installed ComfyUI Managers, you can simply download it with a single click. :partying_face:


So now you can replace the Basic Load Video nodes to VideoHelperSuiteโ€™s Load vide0 node for more features.


And also replace the Basic Save video nodes to VideoHelperSuiteโ€™s Combine node for more features.

Step 6: Enable torch.compile (Optional)

The new Version 2.5 support torch.compile:
According to official claim, 20-40% DiT speedup and 15-25% VAE speedup with full graph compilation

But Triton is required for torch.compile with inductor backend

If you do not have Trition installed, you will get warning.

โ”โ”โ”โ”โ”โ”โ”โ” Phase 1: VAE encoding โ”โ”โ”โ”โ”โ”โ”โ”

[15:13:47.522] โŒ [ERROR] Cannot use torch.compile with 'inductor' backend: Triton is not installed.

Triton is required for the inductor backend which performs kernel fusion and optimization.

To fix this issue:
  1. Install Triton: pip install triton
  2. OR change backend to 'cudagraphs' (lightweight, no Triton needed)
  3. OR disable torch.compile

For more info: https://github.com/triton-lang/triton
[15:13:47.523] โš ๏ธ [WARNING] torch.compile failed for VAE submodules: torch.compile with inductor backend requires Triton. Install with: pip install triton
[15:13:47.523] โš ๏ธ [WARNING]   Falling back to uncompiled VAE


If you do not have Trition installed, you will get warning.

โ”โ”โ”โ”โ”โ”โ”โ” Phase 2: DiT upscaling โ”โ”โ”โ”โ”โ”โ”โ”

[15:13:49.856] โŒ [ERROR] Cannot use torch.compile with 'inductor' backend: Triton is not installed.

Triton is required for the inductor backend which performs kernel fusion and optimization.

To fix this issue:
  1. Install Triton: pip install triton
  2. OR change backend to 'cudagraphs' (lightweight, no Triton needed)
  3. OR disable torch.compile

For more info: https://github.com/triton-lang/triton
[15:13:49.857] โš ๏ธ [WARNING] torch.compile failed for DiT: torch.compile with inductor backend requires Triton. Install with: pip install triton
[15:13:49.857] โš ๏ธ [WARNING]   Falling back to uncompiled model

Step 7: Install Triton (Optional)

If you are using the latest ComfyUI Portable

Python version: 3.13.9 
ComfyUI version: 0.3.68
ComfyUI frontend version: 1.28.8

You can install Triton using following command using CMD, in your comfyui portable folder.

python_embeded\python.exe -m pip install -U "triton-windows<3.6"
D:\ComfyUI_SeedVR2>python_embeded\python.exe -m pip install -U "triton-windows<3.6"
Collecting triton-windows<3.6
  Downloading triton_windows-3.5.0.post21-cp313-cp313-win_amd64.whl.metadata (1.8 kB)
Downloading triton_windows-3.5.0.post21-cp313-cp313-win_amd64.whl (47.3 MB)
   โ”โ”โ”โ”โ”โ”โ”โ”โ”โ”โ”โ”โ”โ”โ”โ”โ”โ”โ”โ”โ”โ”โ”โ”โ”โ”โ”โ”โ”โ”โ”โ”โ”โ”โ”โ”โ”โ”โ”โ” 47.3/47.3 MB 14.4 MB/s  0:00:03
Installing collected packages: triton-windows
Successfully installed triton-windows-3.5.0.post21

After install and restart ComfyUI, you will see Triton :white_check_mark:

โš ๏ธ  SeedVR2 optimizations check: Flash Attention โŒ | Triton โœ…
๐Ÿ’ก Install Flash Attention for faster inference: pip install flash-attn
๐Ÿ”ง Conv3d workaround active: PyTorch 2.9.0, cuDNN 91200 (fixing VAE 3x memory bug)
๐Ÿ“Š Initial CUDA memory: 10.83GB free / 11.99GB total

Note:
The embeded python in ComfyUI Portable does not have all the file required, which can casue file not found error when enable torch.compile.

cuda_utils.c:14: error: include file 'Python.h' not found

Fix:
Download Python 3.13 64-bit from python.org.
After install, copy all the files in C:\Users\your_name\AppData\Local\Programs\Python\Python313\include\ folder to D:\ComfyUI\python_embeded\include


Step 8: Install Flash Attention (Optional)

This repository was created to address a common pain point for AI enthusiasts and developers on the Windows platform: building complex Python packages from source. Libraries like flash-attention, xformers are essential for high-performance AI tasks but often lack official pre-built wheels for Windows, forcing users into a complicated and error-prone compilation process.

The goal here is to provide a centralized, up-to-date collection of direct links to pre-compiled .whl files for these libraries, primarily for the ComfyUI community and other PyTorch users on Windows. This saves you time and lets you focus on whatโ€™s important: creating amazing things with AI.

Pick one that match your CUDA, Python, and Torch Version

For example:

Matches cu128 (CUDA 12.8), cp312 (Python 3.12), and base Torch 2.7.x.

https://huggingface.co/lldacing/flash-attention-windows-wheel/resolve/main/flash_attn-2.7.4.post1+cu128torch2.7.0cxx11abiFALSE-cp312-cp312-win_amd64.whl

Matches cu128 (CUDA 12.8), cp312 (Python 3.12), and base Torch 2.9.x.

https://huggingface.co/Wildminder/AI-windows-whl/resolve/main/flash_attn-2.8.3+cu128torch2.9.0cxx11abiFALSE-cp312-cp312-win_amd64.whl

python_embeded\python.exe -m pip install xxxxxxx.whl

Verify:
python_embeded\python.exe -c "import flash_attn; print('Ready:', flash_attn.__version__)"


Simple Workflow without Triton.